English version
I recently shared with you a cool figure of Carnage, the antagonist of the new Venom movie. Well, it was a figure that some of you really liked and for me it was a pleasure to have shared it with the community.
You can see the post by following this link:.
@gaboamc2393/carnage-sculpture-eng-esp
Thanks to the publication of that figure I had an idea, to accept suggestions from my fellow hivers and make the figures they propose to me. This is what this publication is about, to accept and meet the challenges proposed by you, so I welcome you to this new section in my blog called "Challeng to Gabo".
In the publication of carnage I received the following comment from jcrodriguez:
This is brutal! haven't you made a batman one? damn, I'd like to make a batman one. You have a great talent, even for cooking, because I also saw your post to prepare tongue hahaha.
I thought it was a very good idea because I have never made any batman figure in my life, so I accepted the challenge and here I am going to show you the step by step of how I made the figure.
Well, having said all this, let's start.
The materials I used for this figure are the following:
*Plastiline
*Wire
*Thread
*Glue
*Paint
*Tools: needles, brushes, scissors, pliers.
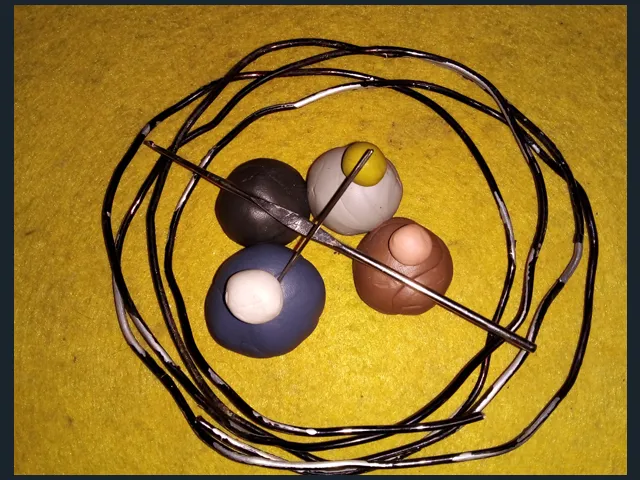
With the wire, glue and thread I made the frame or skeleton of the figure. Almost the entire skeleton is complete, that is, a single piece of molded wire; however, the arms are individual pieces, which I attached to the rest of the skeleton with the wire and glue, as shown in the image below:
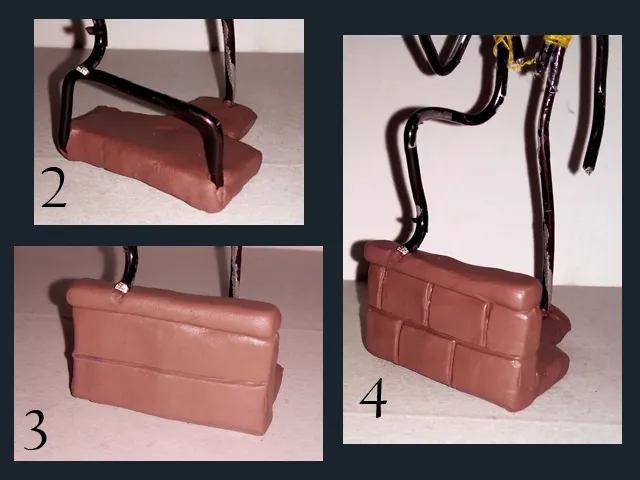
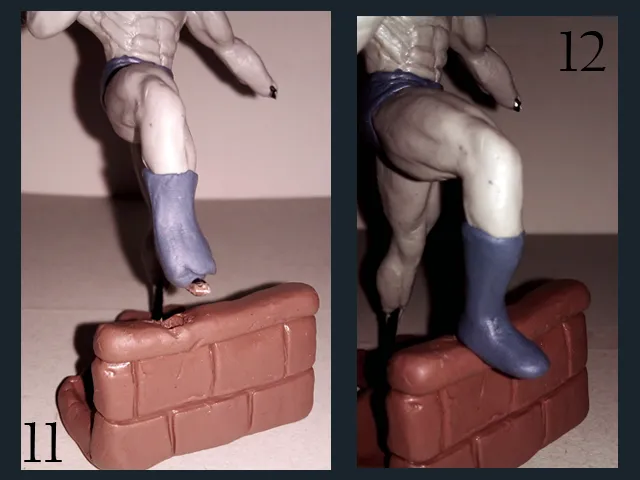
The next step was the base. Batman is a character known for walking on the roofs of Gotham buildings, so I wanted to make a base to simulate the edge of one of these buildings.
First I made the base shape, which I cut with the scissors (2), then I placed the front part (3) and finally I used the needle to outline the shape of the bricks (4).
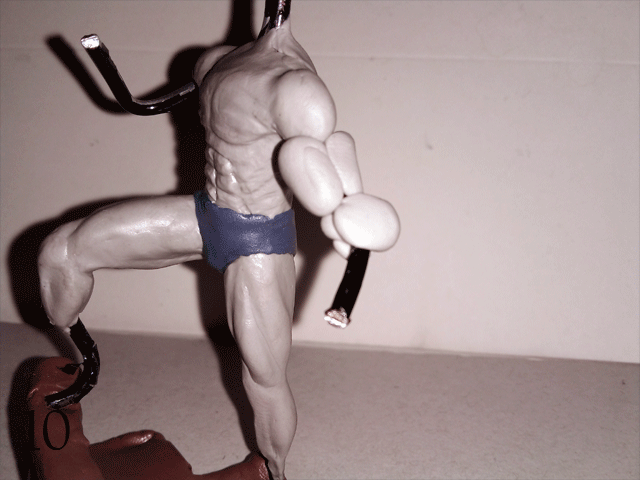
For the batman costume, I decided to go for a style similar to the one in the comics, instead of the design from the movies. I took the gray plasticine and started covering the skeleton, first the legs (5) and then the chest (6).
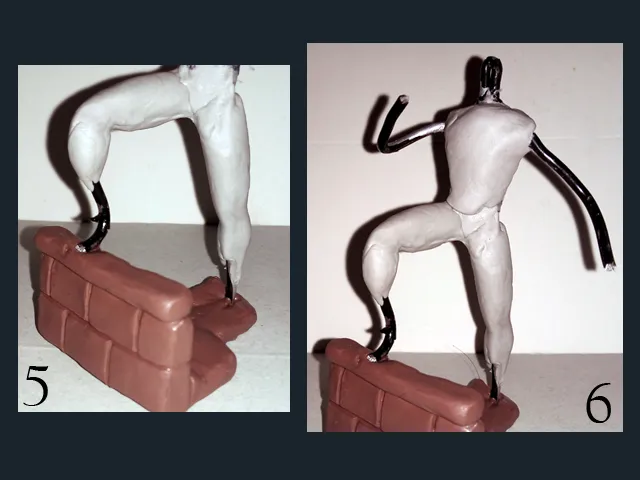
With the help of a knitting needle I started to mold the leg muscles. Batman is quite muscular, in the comics even in an exaggerated way, so I decided to give a lot of muscle to this figure:

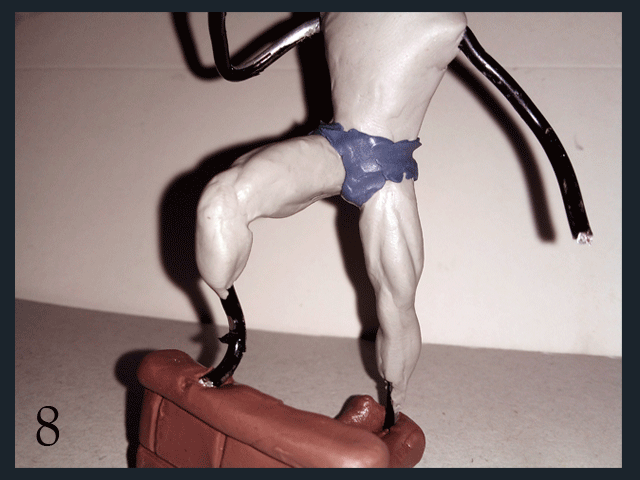
In the waist area I didn't put enough gray plasticine because we have to cover it with the dark blue plasticine that will be used to make the gloves, boots, hood and cape. This for what would become the underpants... yes, I think they are batman's underpants. Below are a couple of animated images of how I did this part:
The next thing was to shape the chest. To create all these muscle shapes I used a knitting needle, which has a rounded tip. You simply take this needle and make the desired shape on the torso, practically as if we were drawing, only that the pencil is a knitting needle and the canvas is plasticine.
This is the technique I use, I simply outline each muscle with the rounded part of this needle until I achieve the desired result. Below you can see an animation of the process:
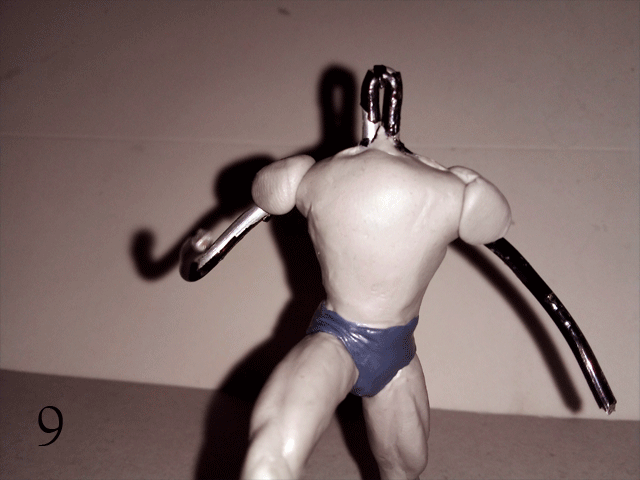
For the arms it is practically the same. First I place the basic shapes for the muscles and then I proceed to close the joints between the plasticine, and then outline with the help of the same knitting needle.
Once the body is ready, we start with the accessories. First the boots. To do this, cover the foot part of the figure (11) and stretch the plasticine to form something like an "L". Then give a rounded shape to the toe of the boot (12).
As decoration, you can place a thin line of plasticine on the edge of the boot, at the junction between the gray part and the blue part.
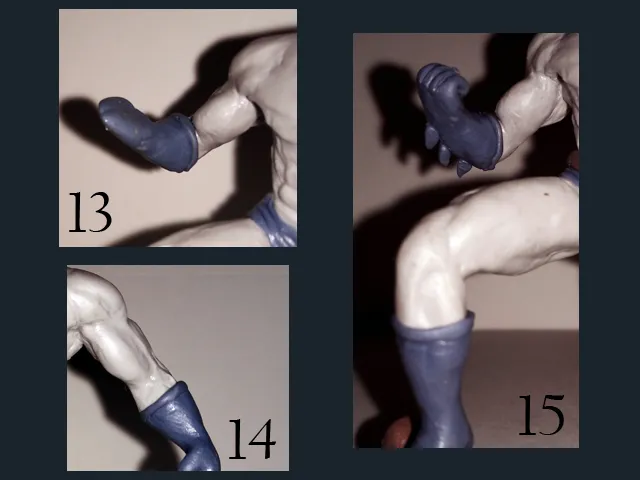
To make the gloves, follow the same process as for the boots. Cover the area of the gloves with a layer of blue plasticine and mold it into the desired shape (13).
The palm of the hand should be stretched and rolled over itself to simulate a fist and optionally a thin line of blue plasticine can be placed on the edge of the glove, between the joints. This is done on the right arm as well (14).
The last thing is to place the blades that have the gloves on the sides, or at the bottom, depending on the angle from which you look at the figure (15).
For the belt, a thin line of brown plasticine is placed around the waist of the figure. Then place some little yellow boxes around this belt. It is very simple and in my case I used the needle to give it a little more realism, adding certain lines to simulate folds and buttons.
The next step is optional, but it gives a lot of life to the figure and has to do with the shadows. Use a thin brush to create shadows on all the lines of the muscles, this highlights them more and creates a better effect than the one you already had.
You should use a slightly darker color to the base gray. Here is the result:
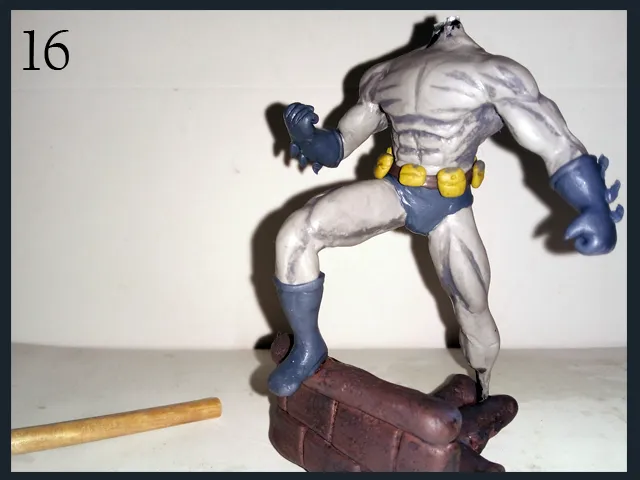
The last thing regarding the body is the bat insignia, this is as simple as making a plasticine pancake and, with the help of a sharp needle, draw on the plasticine the shape of the bat, cut it with the sharp part of the needle and stick it on batman's chest, as shown in the image below:
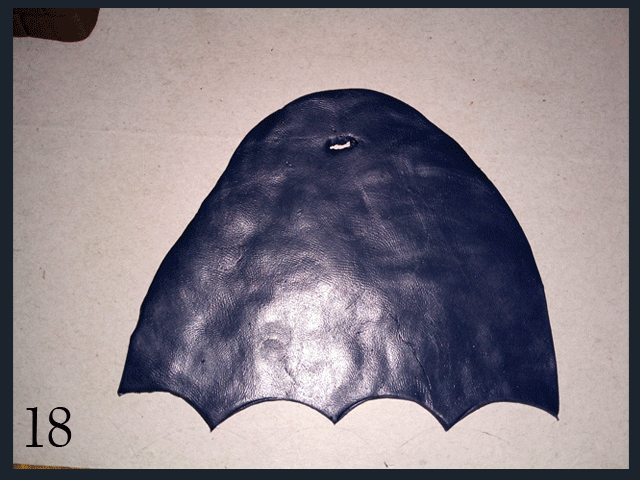
To make the cape, follow the same process as for the bat badge. You squish a LOT of dark blue plasticine, either with your hands or with a rolling pin and cut the plasticine as if it were fabric; I used scissors for this purpose.
Once the shape is made, make a hole in the neck area and put it in place, then make folds to make the cape fall, as if it were real fabric.
Below is an animation of the process.
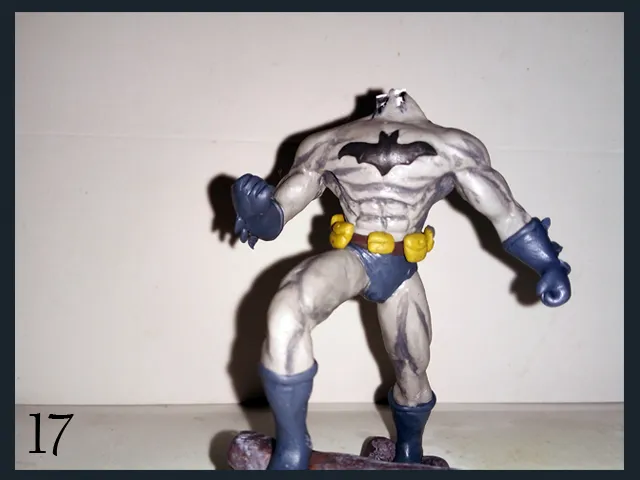
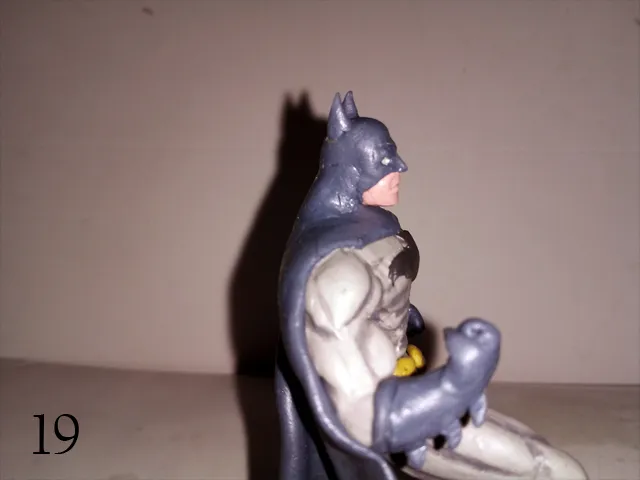
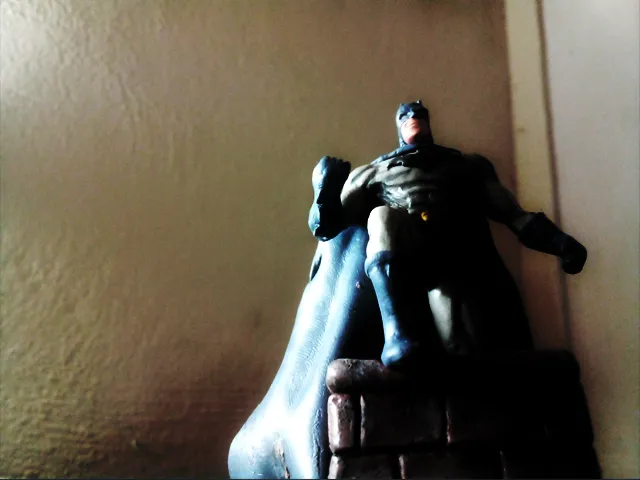
The last part is the head. Here I can't show pictures because I forgot to take pictures during the process, because I concentrated too much on making it; I still show you a picture of this part of the sculpture once it was finished:
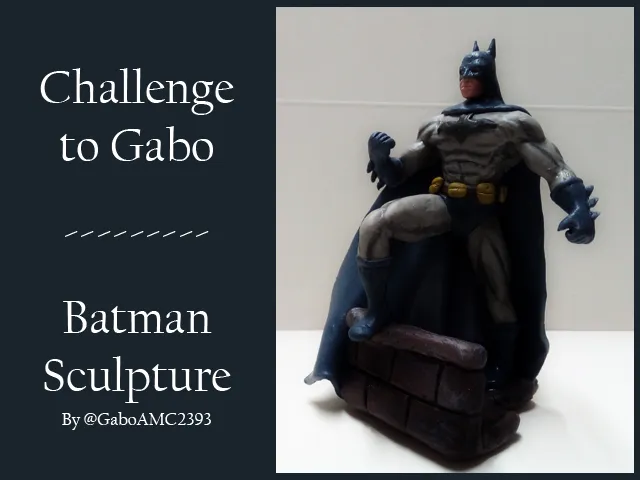
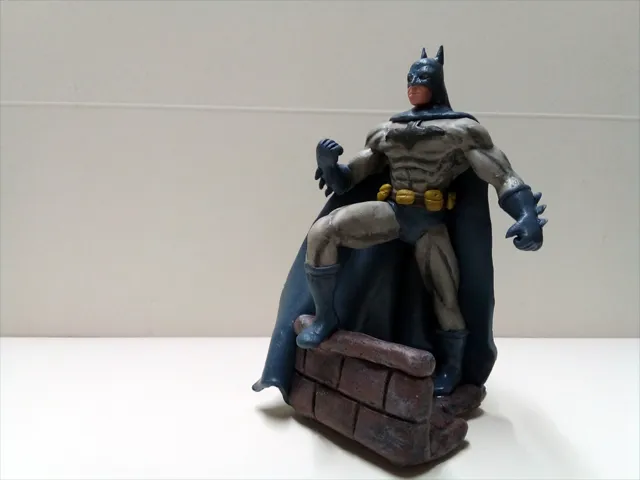
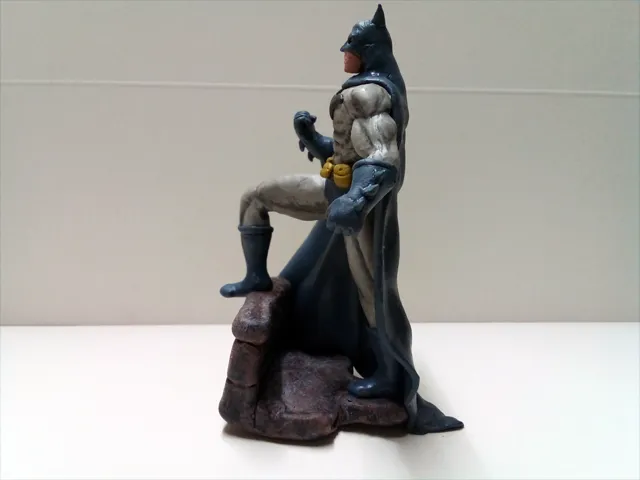
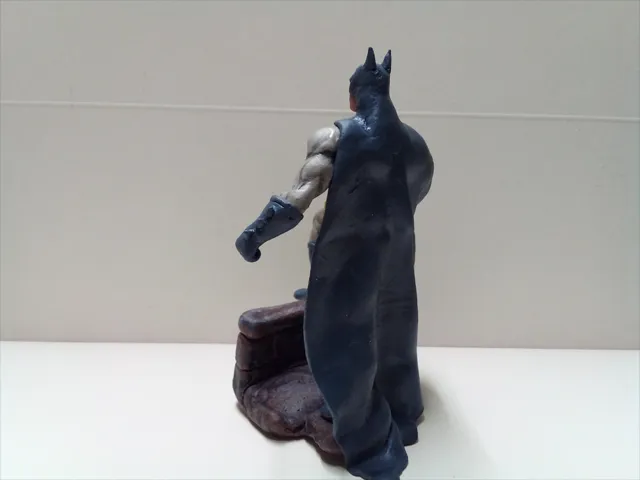
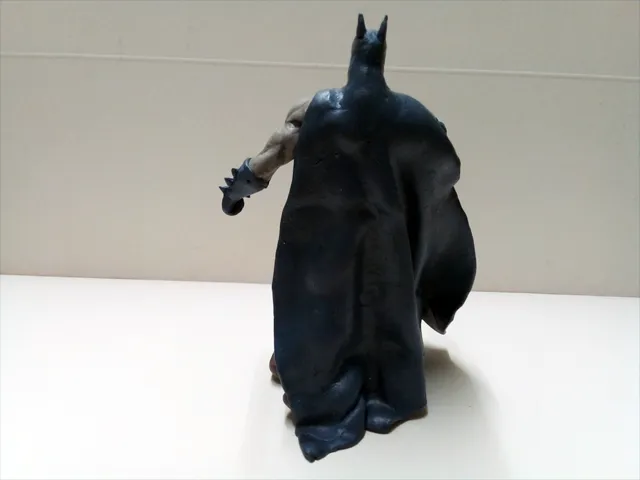
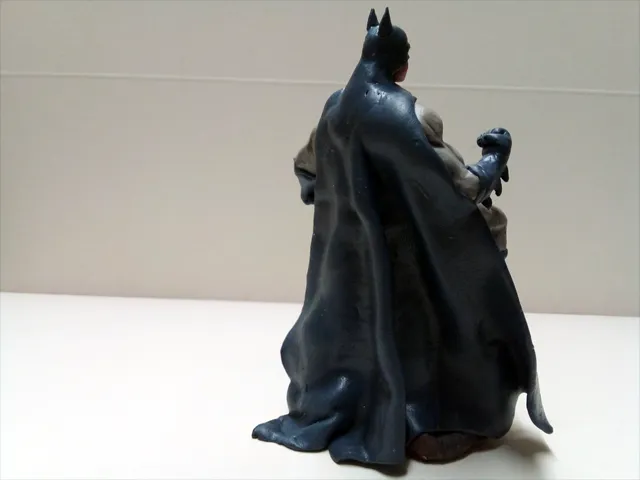
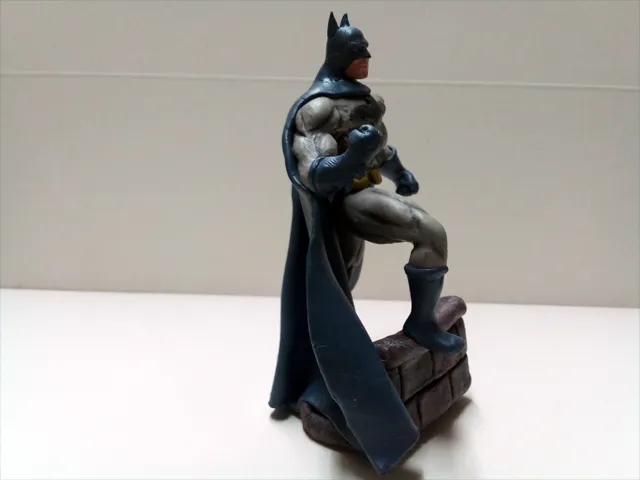
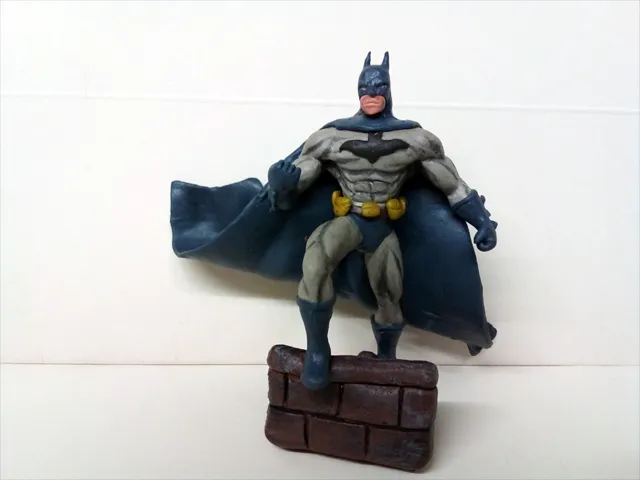
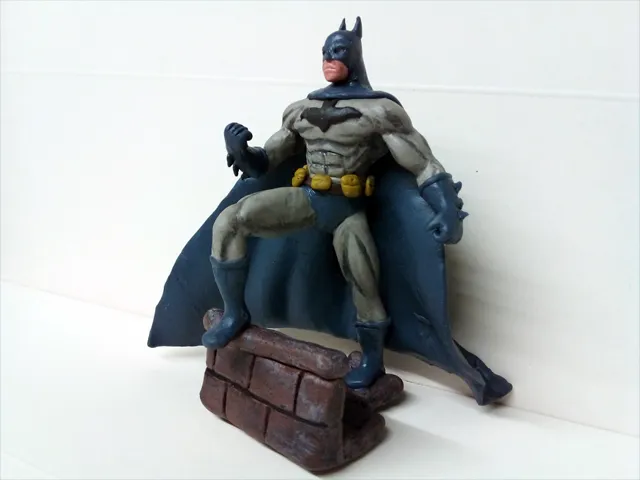
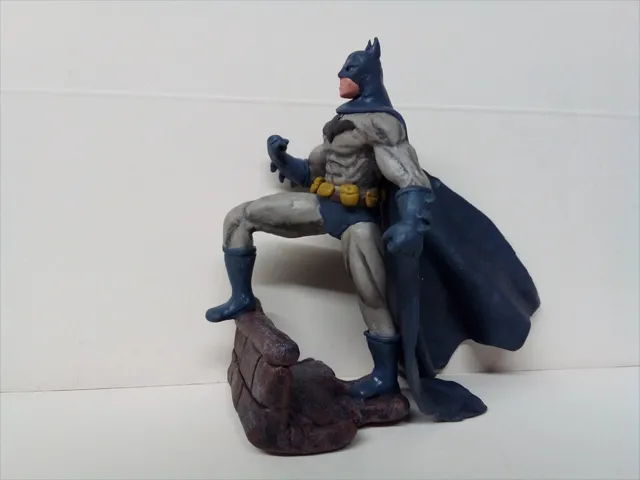
And this is how the Batman figure turned out, a rather difficult character to make in my opinion, but I liked the final result of the figure, with a comic style.
Below I leave a series of photographs of the final result:
What did you think? I loved making this figure and I'm sure you will like it too.
The special thing about this new section of my blog, is that I am not the one who decides which figure to make; well, I do decide, but I do it based on the suggestions or challenges that you give me.
Below in the comments, you can challenge me to make a figure of your choice. I will choose a proposal one among all the ones you have left and that will be the figure I will make for the next challenge. Also, if you like the idea that someone has proposed, you can leave a comment to that user giving support to his idea. If an idea is well supported, I will take it into account.
You see, in this little world of Hive in which we all live together, ideas have a lot of value, so whoever proposed the chosen idea will receive a % of the rewards of this publication. A small reward for the proposed idea.
Well friends, I'm all ears regarding the next challenge. You shoot, challenge me, that's what this publication is all about.
It has been a pleasure, I thank you for your support and for reading my publication. With nothing more to add, I'll say goodbye then....
See you next time!
Versión en español
Hace poco compartí con ustedes una genial figura de Carnage, antagonista de la nueva película de Venom. Pues bien, fue una figura que les gustó mucho a algunos de ustedes y para mi fue un placer haberla compartido con la comunidad.
Pueden ver la publicación siguiendo este enlace:
@gaboamc2393/carnage-sculpture-eng-esp
Gracias a la publicación de esa figura tuve una idea, aceptar sugerencias de mis compañeros hivers y hacer las figuras que me propongan. De esto se trata esta publicación, de aceptar y cumplir los retos propuestos por ustedes, por eso les doy la bienvenida a esta nueva sección en mi blog llamada "Reta a Gabo".
En la publicación de carnage recibí el siguiente comentario de jcrodriguez:
Me pareció una muy buena idea porque no he hecho ninguna figura de batman en la vida, así que acepté el reto y aquí les voy a mostrar el paso a paso de cómo hice la figura.
Bien, dicho todo esto, comencemos.
Los materiales que utilicé para esta figura son los siguientes:
*Plastilina
*Alambre
*Hilo
*Pegamento
*Pintura
*Herramientas: agujas, pinceles, tijera, tenaza.
Con el alambre, el pegamento y el hilo hice el armazón o esqueleto de la figura. Casi todo el esqueleto es completo, es decir, una única pieza de alambre moldeado; sin embargo, los brazos son piezas individuales, las cuales sujeté al resto del esqueleto con el hilo y el pegamento, tal como se observa en la imagen a continuación:
El siguiente paso fue el de la base. Batman es un personaje conocido por andar en los techos de los edificios de Gotham, así que quise hacer una base que simulara el borde de uno de estos edificios.
Primero hice la forma base, la cual corté con la tijera (2), luego coloqué la parte frontal (3) y por último usé la aguja para delinear la forma de los ladrillos (4).
Para el traje de batman, me decidí por un estilo similar al de los comics, en lugar del diseño de las películas. Tomé la plastilina de color gris y comencé a cubrir el esqueleto, primero las piernas (5) y luego el pecho (6).
Con ayuda de una aguja de tejer comencé a moldear los músculos de las piernas. Batman es bastante musculoso, en los comics hasta de manera exagerada, así que decidí darle bastante musculatura a esta figura:
En el área de la cintura no coloqué suficiente plasilina gris porque debemos cubrirla con la plastilina azul oscuro con la que se harán los guantes, las botas, la capucha y la capa. Esto para lo que vendrían a ser los calzones... si, creo que son los calzones de batman. A continuación un par de imágenes animadas de cómo hice esta parte:
Lo siguiente fue moldear el pecho. Para crear todas estas formas de los músculos usé una aguja de tejer, que tiene la punta redondeada. Simplemente hace que tomar esta aguja y hacer la forma deseada sobre el torso, practicamente es como si estuviesemos dibujando, solo que el lápiz es una guja de tejer y el lienzo es la plastilina.
Es la técnica que uso, simplemente voy delineando cada músculo con la parte redondeada de esta aguja hasta lograr el resultado deseado. A continuación pueden ver una animación del proceso:
Para los brazos es prácticamente lo mismo. Primeramente coloco las formas básicas para los músculos y luego procedo a cerrar las uniones entre la plastilina, para luego delinear con ayuda de la misma aguja de tejer.
Una vez listo el cuerpo, comenzamos con los accesorios. Primero las botas. Para esto se cubre la parte del pie de la figura (11) y se estira la plastilina hasta formar algo parecido a una "L". Luego se da forma redondeada a la punta de la bota (12).
Como decoración, pueden colocar una delgada linea de plastilina en el borde de la bota, en la unión entre la parte gris y la parte azul.
Para hacer los guantes se debe seguir el mismo proceso que con las botas. Se cubre el área de los guantes con una capa de plastilina azul y se moldea hasta lograr la forma deseada (13).
Se debe estirar la palma de la mano y enrollarla sobre si misma para simular un puño y de manera opcional se puede colocar una delgada linea de plastilina azul en el borde del guante, entre las uniones.. Esto se hace en el brazo derecho también (14)
Lo último es colocar las cuchillas que tienen los guantes en los laterales, o en la parte de abajo, según desde el ángulo en el que se mire la figura (15).
Para el cinturón, se coloca una delgada línea de plastilina marrón alrededor de la cintura de la figura. Luego se colocan unas cajitas de color amarillo alrededor de este cinturón. Es muy sencillo y en mi caso yo usé la aguja para darle un poco más de realismo, agregando ciertas líneas para simular pliegues y botones.
El siguiente paso es opcional, pero da mucha vida a la figura y tiene que ver con las sombras. Se debe usa un pincel delgado para crear sombras en todas las líneas de los musculos, esto los resalta más y crea un efecto mejor al que ya tenía.
Se debe usar un color un poco más oscuro al gris base. A continuación el resultado:
Lo último en lo que respecta al cuerpo es la insignia del murcielago, esto es tan simple como hacer una tortilla de plastilina y, con ayuda de una aguja afilada, dibujar sobre la plastilina la forma del murcielago, cortarla con la parte filosa de la aguja y pegarla en el pecho de batman, tal como se observa en la imagen a continuación:
Para hacer la capa, se sigue el mismo proceso que para la insignia de murcielago. Se aplasta MUCHA plastilina azul oscuro, ya sea con las manos o con un rodillo y se corta la plastilina como si fuese tela; yo usé tijeras para este fin.
Una vez hecha la forma, se le hace un agujero en el área del cuello y se coloca en su lugar, luego se hacen dobleces para dar caida a la capa, como si fuese tela de verdad.
A continuación una animación del proceso.
Lo último es la cabeza. Aquí no puedo mostrar fotos porque olvidé tomar fotos durante el proceso, porque me concentré demasiado haciéndola; aún así les muestro una foto de esta parte de la escultura una vez terminada:
Y de esta manera quedó la figura de Batman, un personaje bastante difícil de hacer en mi opinión, pero me ha gustado el resultado final de la figura, con un estilo comiquero.
A continuación les dejo una serie de fotografías del resultado final:
¿Qué les pareció? A mi me encantó hacer esta figura y estoy seguro de que les gustará a ustedes también.
Lo especial de esta nueva sección de mi blog, es que no soy yo quien decide qué figura hacer; bueno sí decido, pero lo hago en base a las sugerencias o retos que ustedes me plantean.
Abajo en los comentarios, pueden retarme a hacer una figura que ustedes quieran. Yo elegiré una propuesta una entre todas las que hayan dejado y esa será la figura que haré para el siguiente reto. También, si les gusta la idea que alguien haya propuesto, pueden dejarle un comentario a ese usaurio dando apoyo a su idea. Si una idea es muy apoyada pues la tomaré en cuenta.
Verán, en este mundillo de Hive en el que todos convivimos, las ideas tiene mucho valor, así que quien planteó la idea elegida recibirá un % de las recompenzas de esta publicación. Una pequeña recompenza por la idea propuesta.
Bien amigos, soy todo oidos con respecto al siguiente reto. Ustedes disparen, reten a Gabo, de esto se trata esta publicación.
Ha sido un placer, les agradezco por el apoyo y por haber leido mi publicación. Sin nada más que agregar, me despido entonces...
¡Hasta la próxima!

Traducido con DeepL
Translated with DeepL
My first legendary card
Life finds a way
Black and white drawing


